More thoughts on the warm starting problem…and some science

After furiously pedalling my warm Cyclemaster to get it to start, I found it began to fire as I rolled the throttle to almost closed. So I’m trying to figure out why, as this could lead me to the solution.

Fuelling control on a 2 stroke normally works like this:

  • Pilot jet – controls idle to around 1/4 throttle
  • Slide cutaway – controls 1/8 to around 1/2 throttle
  • Needle and jet – control from 1/4 to 3/4 throttle
  • Main jet – controls from 1/2 to full throttle

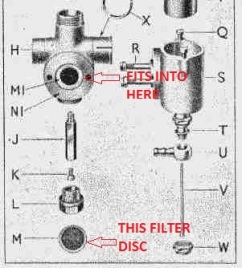
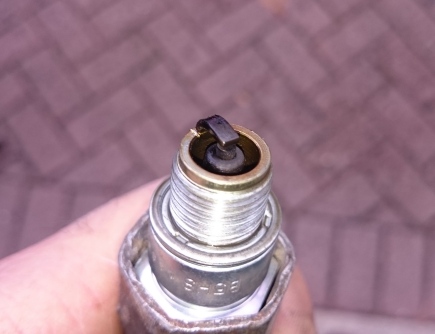
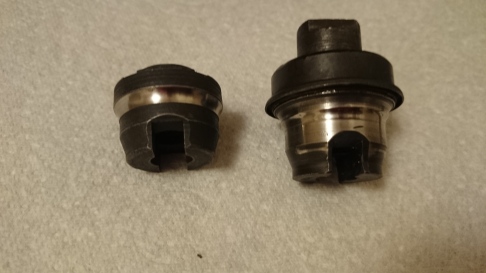
Now the Amal 308 carb is a basic item as it doesn’t have a pilot jet and adjusting screw.  And without a pilot jet, fuelling for warm starting can only be controlled by the cutaway and needle jet. So the next step is to understand how the carburettor works and the answer is the “Venturi Effect”.

The Venturi Effect was discovered by an Italian physicist called Giovanni Battista Venturi and it goes like this:

The Venturi effect is the phenomenon that occurs when a fluid that is flowing through a pipe is forced through a narrow section, resulting in a pressure decrease and a velocity increase.

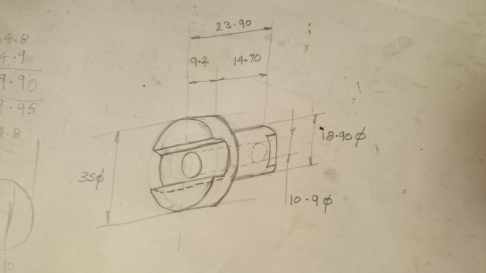
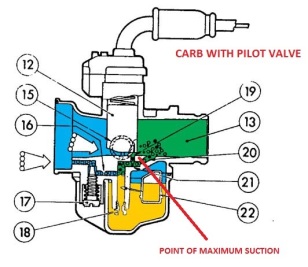
In a carburetor, the pressure decrease creates suction that causes fuel to be sucked into the passing air where it mixes and gets drawn into the engine. When starting a warm engine with a normal carburettor, the fuel would be drawn through the pilot jet and the pilot jet suction port is positioned just behind the front edge of the throttle slide (engine side). This is the narrowest part, so the point where the air is moving the fastest and the point of maximum suction – see diagram below.

slide-closed

However, the Amal 308 doesn’t have a pilot jet, so fuel can only get drawn from the Needle Jet and here, I think, lies the problem; it’s in the wrong position when trying to start a warm engine! The suction just isn’t enough to raise fuel up the Needle Jet Tube, at low air flow.

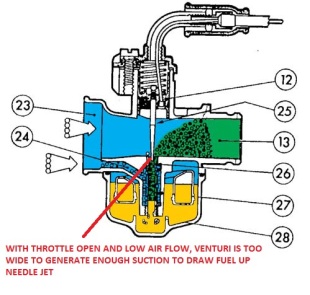
Also it gets worse if you open the throttle. This increases the area above the needle jet, so the air velocity decreases and the suction decreases to the point where no fuel is drawn into the air – hence it won’t start. If some fuel is drawn up, the engine doesn’t fire as it’s getting too much air and the mixture is too weak to fire, as the throttle slide is up.

slide-open

However, as you close the throttle, the air flow is restricted, the mixture gets richer and the engine fires.

I believe this may explain the poor warm starting many Cyclemasters suffer.

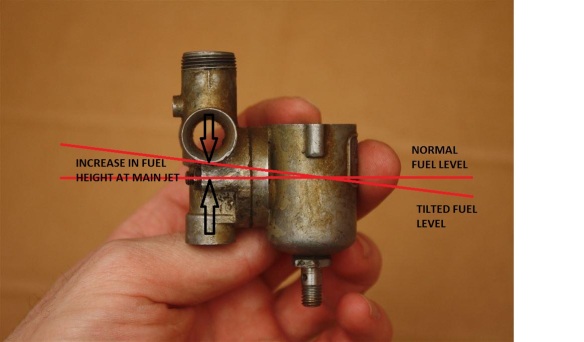
It also explains why tilting the carburettor to the left helps; it simply lets a little petrol run into the venturi. And you probably noticed in my “kick-start” video that the engine started on idle, i.e. throttle slide almost down to get down to get maximum suction at the needle jet and limited air.

So, to start your warm engine, I suggest:

  1. mark the idle position on the throttle control and set it just above this point,
  2. tilt the bike and engine to left for a few seconds (experiment with angle of tilt and time),
  3. kick-start or pedal the bike.

and hopefully, it’ll start – before you run out of breath!

Good luck, I hope this helps and please let me know your experience.

Addendum

For those of a scientific mind the Venturi Effect is governed by the Bernoulli principle. And Bernoulli’s principle is why aeroplanes and birds can fly, why a football follows a curved path when kicked with spin and why ships must maintain a minimum distance when they pass in opposite directions. I can explain if anyone wants to know?

a pearl of wisdom for starting a warm cyclemaster – or it may be baloney..

you decide.

This probably isn’t new to experienced Cyclemaster riders but I’m not one of them, so to me it’s a discovery. A discovery, from the need to stop pedalling up and down the road, to start my Cyclemaster “Sir Walter” and annoying the neighbours.

The first 15 mile ride has noticeably improved the engine, it even sounds crisper and it was definitely going better at the end. However, it does have a problem starting after standing for 10 to 15 minutes. Starting from cold – no problem. Starting straight after stopping – no problem. But after 10 minutes it just takes a lot of pedalling before it fires. My Cyclemaster friend, John, tells me he also has the same problem and I know from the internet that others do, so what’s the cause?

Well, I’m thinking the motor runs a fairly weak mixture as it gets 240 MPG and this makes it reluctant to start when it’s cooled a little. I’ve tried the choke but this just floods it as I can smell petrol when pedalling and it doesn’t have a float “tickler” to raise the fuel level and richen the mixture.

However, it seems to start really well “kick-started” as shown below

and I have an explanation and it goes like this.

When you kick-start the way I did, the bike and motor are tilted to the left. Now the float bowl is on the right of the carburetor and the petrol exists the float bowl on the left. So when you tilt left you raise the fuel level at the main jet and this richens the mixture – like “tickling” the carb.

fuel-level

This theory may be a load of gibberish or baloney (or rotvälska for my swedish followers) . Or it may be a pearl of wisdom. So I’d be interested in your views and whether it works for other Cyclemaster riders?

You could of course, pedal in a fast, tight circle to the left and this may work as well but I take no responsibility if you get dizzy and fall off!

Get your motor runnin’

Head out on the highway…

They say 3 types of people ride Mopeds (or Cyclemasters): the young, the poor and the eccentric..

For those who don’t know me, the following short video clip should help you to decide.

A brief clip of my first 15 mile ride on Sir Walter that I hope captures the pleasure of riding such a feeble piece of motoring history – slow, noisy, no brakes, uncomfortable and yet great fun! I really must be a true petrol head (as well as eccentric!) as I got as much enjoyment from my Cyclemaster as I do from driving a sportscar, or a modern sportsbike – odd but true.

I guess, it’s all to do with how much input you get from your senses and how much adrenaline you get in your veins, or how big an endorphin rush you get. Out in the fresh air, exercising (read pedalling), the noise of the buzzing 2 stroke, the smell of castrol R (or Comma 2 stroke from Wilko), the squirming of rubber on tarmac (i.e. juddering), the scraping of knee slider (or was it the pedal?), the rear stepping out when you get on the gas (did you see the tarmac get closer?), ALL add to the experience.

In the words of Steppenwolf:

Get your motor runnin’
Head out on the highway
Lookin’ for adventure
And whatever comes our way…….

Like a true nature’s child
We were born, born to be wild
We can climb so high
I never want to die

Born to be wild
Born to be wild


First test run.. with a flat cap

because a flat cap makes all the difference.. doesn’t it?

But fitting the cyclemaster wasn’t as easy as the manual indicates.The biggest problem was setting the drive chain tension, probably because it’s badly stretched. I found that when I dropped the engine to tension the chain, the carb clashed with the wheel. So I tried turning the eccentric adjuster into the forward position, then the plug cap clashed. So then I fitted a shorter plug cap and that seemed OK.

The next difficulty, was setting the wheel cones – very important as too slack will cause wear and a wobbly wheel and too tight will overload the bearings, leading to early failure. Anyway, I eventually got a reasonable setting, only to find the drive chain was now too tight – back to square one..

After a couple of hours the bearings and chain seemed OK, so time for a test ride and here we go.. with a cap.

and it goes downhill but struggles up….or is that just me expecting too much from 32cc and 0.8HP? I gather the “secret” is to pedal early to keep the engine revs up and in its power band but I’m not sure it has one.

Great fun though and the back pedalling brake actually works but I won’t be leaving any black lines just yet!

And after a bit of tinkering it’s also ticking over quite well.

Next step is to make and fit a number plate. And yes, the DVLA have came up trumps and I have a nice new log book, with the original number and better still it’s transferrable.

However,immediately after my first ride, I got a “sign”. I received an invite from the buzzing club (The National Autocycle and Cyclemotor Club) to join them on the C2C in June – see link.

http://thebuzzingclub.net/news/coast-to-coast-2017-the-dates-in/

Two journalists did it last year on a motorised tandem and that set me thinking. One of my sons has an old tandem. Would any of them be up for it? Or perhaps each of them in rotation – wear one out, then swop.

And I could fit the Cyclemaster to the front wheel, then we’d have a full set of gears, rather than just one and that will help with the serious climb up to Alston.

I wonder…?

I’ll let you know..


beware, this gets technical….

so switch off now, if this type of stuff bores you.

In this blog, I’ve listed some things I’ve learnt when re-building my Cyclemaster engine and some tips that may help you. They are based on my experience but if you don’t agree with something,  then feel free to just ignore it.

1/ Put the small crankcase casting on after the clutch casting

You can then support the crankshaft at the opposite end to take the reaction from pressing on the drive gear and the clutch housing. This also ensures the crankshaft is fully into the drive side housing and avoids the risk that it may be mis-aligned and put excess pressure of the disc valve.

engine-schematic

However you must put a support between the crankshaft webs – see below

I measured the crankshaft web gap at 6.88mm, then found a spanner that measured 6.83mm thick – perfect. Just insert the spanner between the webs and you won’t damage the crank, if you have to tap the clutch casting on.

2/ Warm castings before fitting them.

This makes it easier to fit them where bearings are a press fit. I use a heat gun, gently, on low heat setting.

3/ Repair crankshaft taper and magneto fit

My crankshaft was damaged and the magneto wasn’t fitting correctly. This is the reason it sheared 2 woodruff keys. It also explains why the flywheel was loose when I got the engine and the Woodruff key was missing.

dsc_0003new-text-2

Look closely and you can see the crankshaft taper is swollen. This was repaired by gently filing the raised area down, then putting fine lapping compound on the shaft and spinning the flywheel without the key fitted. When the fit had improved, I finished it off by lapping the joint with chrome polish – Solvol Autosol in my case.

The flywheel still didn’t tighten onto the taper correctly and this was because the nut was also too tight, as some threads were swollen.

dsc_0018-text-cut

I used a gauge to measure the tpi (threads per inch) at 24 and my vernier to measure the thread OD (outside diameter) at 0.305″. The nearest thread I could find was 5/16″ x 24tpi UNF (Unified) so I bought a die to cut the thread so the nut would go fully onto the thread.

                       CUTTING THREAD WITH DIE                 FINISHED SHAFT

Hopefully that’s the end of my flywheel problems. Only downside is I’ll need a “Puller” to get it off now, as previously it just came off when the nut was loosened.

4/ Make your own gaskets.

It saves a little money and is quite a satisfying job to do.I’ve been collecting bits of brown paper for a while, so just select a piece that is the right thickness and rub it over the casting. It’s like tree bark rubbing but use a dirty finger rather than a crayon. Then I tap the holes very gently with a small spanner to cut them out.

Finally cut the profile, using curved nail scissors for the tricky bits if necessary. And this is the finished gasket.

dsc_0014

5/ Do a little tuning when it’s in pieces

I can’t be certain this will help but improving gas flow can’t do any harm. I polished the transfer ports and removed sharp edges, as shown.

dsc_0006-text

6. My tips for fitting clutch Hub

The Cyclemaster manual recommends you fully assemble the clutch plates, then fit the assembly to the output shaft (LH photo). However if you do it this way you cannot see if the Woodruff Key is correctly located. So I suggest you leave the cover plate off and fit it when the clutch is on the output shaft (RH photo) – see below:

Also I find it helps to hold the key in position with a small screwdriver down the back.

Finally check you can see the end of the key. 

DSC_0022 TEXT.jpg

If the key is not in position you will have no drive and the engine will need to be opened again.

7. Amal carburettor

The main jet in the carburettor is very small as the engine is small and does not need much petrol. This makes the jet very sensitive to dirt and it blocks very easy. My engine was running badly then would not start so I cleaned the jet.

Some people say the filter disc from the float chamber must be fitted a certain way or the fuel does not flow through it. I cannot see why the fuel would not flow both ways but I turned mine anyway.

amalparts-crop-text

and now it starts, runs and idles well – see video. I think it was dirt in the jet but I can’t be certain; turning the filter may have helped.

After running for 30 mins at low revs the spark plug looks like this. 

dsc_0037crop

It’s dark brown which indicates perhaps a little rich but this is better than white as that indicates too lean, which can lead to piston seizure. So I’ll leave the fuel mixture as it is, until the engine has done more mileage.

But to do that, I’ll need to get it into the Raleigh, or “Sir Walter” as he’s called and that’s the next job.


learn to play the clarinet like Acker Bilk…..

or make some vegetable soup; it’s easier and it’s part of your 5 a day.

For those unfortunate to be born too late, go to the following link to catch up.

Anyway, courgettes and lettuce are in short supply (and therefore expensive), so go for what the great British climate provides – parsnips and carrots. Peel, chop them up and throw them in a pan, after frying some onion in butter for 10 mins. Pour in a litre or so of chicken stock and this is what you get – yummy or what?

dsc_0030

Put it on low, have a coffee and forget about it for half an hour, unless you remember to stir it halfway through (optional).

If it looks mushy, then it’s probably cooked, so throw it in a liquidiser and build up the courage to taste it but expect it to taste worse than rubbish.. Empty the cupboards until you find the one with spices and keep adding them until it tastes OK. A tablespoon of Curry powder works great (trust me) or mixed spices etc. Oh and add salt and pepper or seasoning as the professionals call it.

If you’re lucky (or unlucky as you’ll have to eat it), it’ll turn out like this.

dsc_0031

Add water until you get the consistency of fresh wallpaper paste and that’s it. Eat it, freeze it or give it to the dog; but don’t tell the RSPCA.

Throw some bits on the top if you want, like cream or chopped tomato, or croutons (bits of toast with the crust cut off) or anything green and edible like Parsley and it’ll be as good as starter from a posh restaurant. Serve it with hot crusty bread and I guarantee you’ll enjoy it.

But be prepared; after a few hours you’ll be playing “Stranger on the Shore”, like a pro.

Square balls and not enough of them….

In my last blog on the Raleigh, I said the steering head felt like it had square balls in the bearing race.. and it does!

dsc_0005-cut-2

They are far from spherical as you can see! And there was 21 balls in the top race and 19 in the bottom which doesn’t sound right and it isn’t. However the bearing cups look good, so it’s an easy repair.

An old Raleigh parts list I’ve found indicates 25 x 5/32″ balls top and bottom and Simlybearings.co.uk have done a great job; ordered mid afternoon and delivered next day. The question now is what grease to use. It needs to be thick enough to ensure the balls rotate rather than slide, as it’s sliding that puts flats on the balls. Phil Woods Hub Grease is highly rated so I think I’ll try that. It’ll also do for the Cyclemaster Eadie Hub I’m rebuilding with new cones – see my other blog.

New hub cones have arrived but….

will they fit? Luckily the 2 cones on the drive sprocket side, are straightforward. But the brake cone isn’t, as the photo shows:

dsc_0012

SO HOW DO I CHANGE THIS……..INTO THIS

This cone takes the reaction of the brake (hence it’s often called the brake cone) so I need an adaptor to fit onto the flats on the reverse side of the new cone – see sketch.

dsc_0019

Fortunately, I have a friend with a lathe and many years ago I was trained as a toolmaker (46 years ago to be exact), so it can’t be that difficult can it?

I also need a small adapter ring to fit the dust shield to the new cone as the diameter is smaller, so I figure it’s best to start by making a plastic adaptor on the lathe.. and it works out OK.

TURNED ADAPTOR                           ADAPTOR IN PLACE

Now onto the steel part. The only material I could “acquire” was EN8 which is a medium carbon steel with good tensile strength; good for this application but a little hard for an amateur like me to machine. In the end I used a TCT tool (tungsten carbide tip) and it cuts OK but needs a little polishing to improve the surface finish.

Those of you familiar with lathe work will wonder how I added the slot – WITHOUT A MILLING MACHINE?

Well, I had to get inventive. I made another adaptor to clamp the turned part in the fixed tool holder, put an 8mm slot drill into the chuck and then used the cross slide to traverse the part over the spinning slot drill. Basically, I adapted the lathe to work like a milling machine. I’m sure it’s been done before but not by me, so I was quite chuffed that it worked …and I still have ten fingers (or is it eight fingers and two thumbs?)

The finished part looks like this,

NB: You may think the original cone looks OK but I polished the seat in a drill as I was thinking of using it. However,

  1. It is soft as the case hardening has worn through and
  2. I noticed the final drive chain from the the engine had been rubbing on the wheel and I think it’s because the seat on the cone has worn back. As the cone wears the engine moves inwards with it.

So I’m hoping the new cone will solve that problem and work reliably, as I don’t want it to fail when I’m doing Lejog; do I?

Update 11 February 2017

I’ve filed the flats on the adaptor; it took a while even though I removed the bulk of metal with a hacksaw but the outcome is fine.

 Good to know I haven’t lost the metal filing skills from when I was a first year apprentice in 1970. I remember spending what seemed like days, filing the same piece of metal, to get it flat and square enough to pass my “phase test” but the techniques obviously stuck.

The finished assembly looks like this:

As the RH photos shows, the dust shield lines up well with the mating fixed part in the Hub.

New cones fitted with new bearings, spindle and grease – job done!


now I’ve got the wheels…

and they are a Raleigh Superb Dawn Tourer, of uncertain vintage, although of 50’s style.

The Hub is stamped 66, meaning 1966, so that could be the year of manufacture, or it may be a replacement, newer wheel. The frame number has the suffix “FJ” and I’ve seen reference to “FE” being 1966, so maybe it’s later. Who know’s, let’s call it 66 as that was good year, England won the World Cup, The Beatles were number one with Paperback Writer and I was 12.

dsc_6931dsc_6913

It’s got a great leather seat made by “Wrights”, who were acquired by the world famous Brookes Saddles in 1960. Brookes, sold most designs of saddle under the Brooks and Wrights labels; the Brookes model allegedly using better grade leather, although this is disputed by some. Mine’s got a small split which just adds to the character in my opinion – as long as it doesn’t get bigger.

It’s really quite an advanced bike with 4 speed Sturmey Archer (that works), a dynamo in the rear hub and a big headlight that is all show with no show, if you get my drift.If it was rated in Candela, the measure would be milli Candela, it’s that bad.

There’s also a steering lock with a key which is amazing; not the steering lock (although that’s pretty good) but the fact the key hasn’t got lost in 50 years!

I say “it”, when I should be saying “he” and he’s got a name – Sir Walter. Soon to be “Sir Walter – pht, pht (reg number but read it as phut, phut) when the marriage takes place to Lady Cyclemaster of Bristol. Yes, I know, very corny.

He needs a bit of work though. The brakes worse than useless. The steering head bearings were very loose, so I adjusted them to remove the play and now it feels like the head race is fitted with square balls. And the handlebar support for the front rod brake lever is loose, so it’s either snapped or the nut has came off on the inside of the bars.

Anyway, a few fill in jobs to do, when time allows.


we have lift off….

buy not at the first attempt unfortunately.

I tried the trick of adding a little petrol down the spark plug hole and a got very short run at the second attempt, then nothing.

Then I tried trick number two and heated an old spark plug as this helps the engine to fire. But to no avail again.

So I reduced the contact breaker gap to try that… and nothing happened.

So I made the gap bigger at the recommended max of 0.018″… and again nothing happened, not a cough or a putt or even a back-fire!

So I tried raising needle in the carburetor, to increase the fuel to air ratio as it did fire with fuel down the plug. But you guessed it – still dead.

In desperation, I then lowered the needle to weaken the mixture, not expecting it to work, and it didn’t!

On the verge of giving up , I checked the spark and it was very weak. There was an intermittent spark on a plug held against the cylinder head. However, a better test is to see how far the spark will jump, as distance is proportional to voltage. A good spark will jump 3/16″ in old units or approx 4 mm. The best I could get was less than 1 mm, so the plug sparked when out of the engine, as the plug gap is 0.5 mm, but would not spark under compression pressure in the engine as the magneto output is too low. Progress, as at least I know why it won’t start; now I need to find the cause so off with the flywheel.

The only thing I noticed was the the Woodruff key was partially sheared. I figure this has happened as the flywheel is not a very good fit on the crankshaft taper and it rocks a little. The purpose of the key is to align the flywheel with the stator coils to get maximum magnetic flux at the point the contact breaker opens. The taper on the shaft is intended to do the rotational driving of the flywheel. However, on this engine, the taper is not mating correctly the key has to do the driving and it’s too weak to take it; hence the partial shear. I doubt this is the cause (wrongly) but make a new key from a suitable washer, as a temporary fix.

By now, I’m lacking confidence it will ever start, so I use my final trick of heating the cylinder head with the spark plug fitted, using a heat gun.

and the results are in the link below:

So the partially sheared Woodruff key was the root cause.

I just need to get it running better now, as I can’t rely on a heat gun to start it when doing Lejog  (Scotland doesn’t have electricity – does it?)

Oh, and I’ll explain “Lejog” another day.