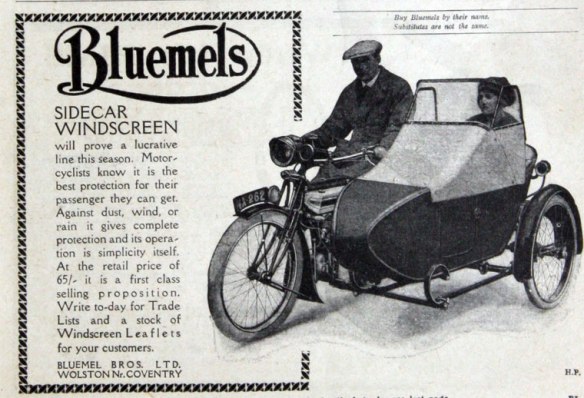
that’s Mr Bluemels of the world famous Bluemels Brothers Ltd. – manufacturer of automotive accessories and more importantly, number plates!
For most of the 20th century there was one motor accessory manufacturer whose name stood for top quality British Engineering and that company was Bluemel Bros Ltd.. Founded in 1860, at one time they manufactured a huge range of superb quality products including OEM steering wheels, auto lamps, cycle lamps and accessories for grand touring cars. They were one of the few regular suppliers to the bespoke coach builders of the 20’s & 30’s, catering to the likes of Rolls Royce & Bentley. As the coach built motor business shrank with the introduction of serious mass production in the 50’s, so Bluemel’s business evolved and by 1961, their portfolio included auto, bicycle, and motorcycle accessories, plastic moldings, dials, and number plates.

However, by 1983 the company faced insolvency. And like so many great British companies they folded. Worse still the name lives on in the guise of SKS Bluemel – a German bicycle mudguard manufacturer – how sad. And so typical of many other great British companies.
So, it’s down to me to make the rear number plate for my Cyclemaster. I doubt I can do it as well as the Bluemels Brothers but I’ll give it a try. The first thing I need is some material and I’ve “acquired” some 18 SWG mild steel sheet and some aluminium sheet. Applying the Colin Chapman principle, the ali would be better as it’s lighter and more suited to my puny engine and equally puny legs!. However, I’d prefer to weld the mounting brackets in place, rather than have unsightly bolt heads showing, so the steel it is; and I’ll just have to work on the legs.
So after cutting the required size, I scribe a line 5mm from the edge to form a “safety edge” (bent back, in other words). The line is positioned in the vice and the blank bent back using a rubber mallet to avoid denting the plate.


Each side is bent back to within 25mm of the corners. I then cut a suitable radius on each corner with tin snips and formed each corner back, using an old socket.


I left a tab in the centre of the top edge for a rear light. Now, to keep the boys in blue happy, it should really have a clear area on the lens to illuminate the number plate and comply with the Road Traffic Acts. However, I’m a risk taker (and a cheapskate), so I’m just using the Raleigh rear light. My plead for leniency would go like this, “Being practical officer this autocycle doesn’t go any faster than a bicycle. So if you want to record my registration number, in the dark, just walk alongside (or jog if I’m going downhill) and ask me”.


Now I need mounting brackets; one at the bottom with a single bolt fixing i think and one slightly above the middle with two bolt fixing. Bottom bracket first. I cut a strip of steel then formed it into a U shape as shown below, using a suitable screwdriver as a former.


I then turned it over in the vice to close it up, then squeezed it back on itself.


After drilling and filing to smooth the edges and clean it up, the finished bracket looks like this. Ready for welding, once I’ve made the top bracket.

Which is a bit more difficult, as I’d like it to follow the form of the mudguard. I started by bending a strip of steel around suitable formers by hand – my bike stand and a screwdriver in this case – see below.


However, my rear mudguard has a raised centre section so the bracket needs a relief groove to clear it. I formed this, using the vice (again) and a screwdriver (again) and a hammer .


and it turned out fairly well. Not perfect but the shape can be carefully improved by using (you’ve guessed) a hammer.


I just need to cut and bend back the tabs and it’s ready for welding onto the plate. To get the angle and length of the right, I used the well tried method of cutting a piece of cardboard as a template – easy to cut to get it right then use it to mark the metal.
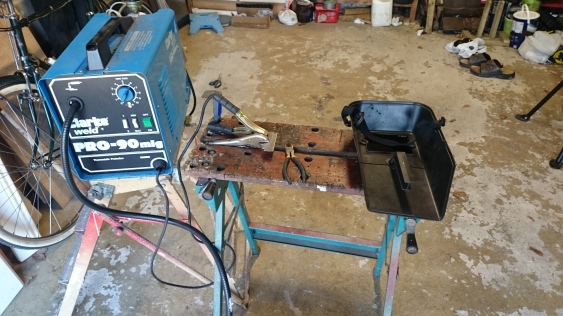
Now welding is a bit like brick laying. You don’t need a degree in engineering, you just need years of practice and more practice. I wasn’t a bad oxy acetylene welder in my day but that was in the 70’s. And when I say “my day”, I mean ONE day! So, first thing is to set up the MIG in the “welding bay”.
I’d love to say the weld below was my first attempt but it wasn’t. “Pigeon droppings” is an apt description of the test welds but it did come together eventually – unfortunately on the last one.

And after priming and painting, this is the result.

The last job is to fix the self adhesive alphanumerics and this can be difficult as you only get one chance. The method I used was to apply masking tape as a base line to get them level. I marked the tape with the position of each alphanumeric, leaving me with the task of making sure they were straight.


And now the final steps of drilling, fitting and standing back and admiring.


but the Bluemels Brothers would have nothing to worry about, had they survived.
and finally, some Bluemels adverts from Graces guide,


and the last one is a gem.

I particularly like the bit, “a junior member of staff (male or female) can handle the simple assembly procedure.” In other words, so simple a female can do it – sexism hadn’t yet been invented, just practiced!
And look at the name of the Sales Executive…..

Really enjoyed reading your post; inspirational ingenuity 🙂
LikeLike